HOWTO: Provision the Bridge for Your NEVM ERC-20
This guide is for adding a token to the Syscoin Bridge. Reach out to us via the Syscoin Community Wiki if you need assistance or further information during this process.
This is a full walk-through for provisioning Syscoin Bridge to operate with any particular Standard ERC-20. At the end of this walk-through you will have established the necessary components to enable sending your chosen ERC-20 from NEVM to the UTXO chain in order to leverage benefits like scalable microtransactions and Bitcoin-core-compliant security. You will also be able to move them back to NEVM as needed. You can also keep a quantity of tokens present on both sides for maximum convenience.
You are encouraged to use the Syscoin 4.x Testnet prior to Mainnet implementation of your ERC-20 bridge.
Syscoin Bridge is fully functional between the Syscoin UTXO Testnet and the Syscoin NEVM Tanenbaum Testnet.
Follow these instructions to get started with the Syscoin Testnet.
Read the Testnet FAQ.
A Testnet implementation of the Bridge Dapp is available at bridge-testnet.syscoin.org.
Follow each step closely.
These instructions apply to both mainnet and testnet implementations.
1. Assess the ERC-20 token spec and note the relevant attributes
Use explorer.syscoin.org to view the token spec of your ERC-20.
Note the following.
- Max supply (if specified - otherwise total circulating supply)
- Precision
- Token contract address
These will be used when creating your Syscoin Platform Token. In most cases the SPT max supply and precision attributes should be equal or as close as possible to those of the ERC-20 spec. An SPT with a max of 8 decimals of precision can have a max supply of up to 9,999,999,999 tokens. Your bridge will still work if these attributes cannot be configured identically, but it is best to be as close as possible to the ERC-20, especially if your are planning this token bridge for public use.
Make sure the ERC-20 conforms to the ERC-20 Standard, evidenced by the following functions being present in the smart contract: approve, transferFrom, allowance, balanceOf. The vast majority of tokens do conform. However, tokens such as KuCoin Shares and a limited number of older ERC-20s which do not conform, might not work properly with Syscoin Bridge. Tether USD is one exception of an older non-Standard token which does work.
2. Ensure you have sufficient funds to create the token
Make sure you have at least 1 SYS plus enough to fund the gas required for issuance and transfers. The cost of creating a new SPT as of the date of this document is 1 SYS. Wait until your transaction has at least one confirmation, then proceed to the next step.
3. Define and create your Syscoin Platform Token (SPT)
We will now define then create the SPT using the assetnew command.
assetnew funding_amount "symbol" "description" "contract" precision max_supply ( updatecapability_flags "notary_address" {"endpoint":"str","instant_transfers":bool,"hd_required":bool} {"auxfee_address":"str","fee_struct":[,,...]} )

Create a new asset

Arguments:
1. funding_amount                    (numeric or string, required) Fund resulting UTXO owning the asset by this much SYS for gas.
2. symbol                            (string, required) Asset symbol (1-8 characters)
3. description                       (string, required) Public description of the token.
4. contract                          (string, required) Ethereum token contract for SyscoinX bridge. Must be in hex and not include the '0x' format tag. For example contract '0xb060ddb93707d2bc2f8bcc39451a5a28852f8d1d' should be set as 'b060ddb93707d2bc2f8bcc39451a5a28852f8d1d'. Leave empty for no smart contract bridge.
5. precision                         (numeric, required) Precision of balances. Must be between 0 and 8. The lower it is the higher possible max_supply is available since the supply is represented as a 64 bit integer. With a precision of 8 the max supply is 10 billion.
6. max_supply                        (numeric or string, required) Maximum supply of this asset. Depends on the precision value that is set, the lower the precision the higher max_supply can be.
7. updatecapability_flags            (numeric) Ability to update certain fields. Must be decimal value which is a bitmask for certain rights to update. The bitmask 1 represents the ability to update public data field, 2 for updating the smart contract field, 4 for updating supply, 8 for updating notary address, 16 for updating notary details, 32 for updating auxfee details, 64 for ability to update the capability flags (this field). 127 for all. 0 for none (not updatable).
8. notary_address                    (string) Notary address
9. notary_details                    (json object) Notary details structure (if notary_address is set)
     {
       "endpoint": "str",            (string, required) Notary API endpoint (if applicable)
       "instant_transfers": bool,    (boolean, required) Enforced double-spend prevention on Notary for Instant Transfers
       "hd_required": bool,          (boolean, required) If Notary requires HD Wallet approval (for sender approval specifically applicable to change address schemes), usually in the form of account XPUB or Verifiable Credential of account XPUB using DID
     }
10. auxfee_details                   (json object) Auxiliary fee structure (may be enforced if notary is set)
     {
       "auxfee_address": "str",      (string, required) AuxFee address
       "fee_struct": [               (json array, required) Auxiliary fee structure
         ,                           (numeric or string, required) Bound (in amount) for for the fee level based on total transaction amount
         ,                           (numeric, required) The percentage in %% to share with the operator. The value must be
                                     between 0.00(0%%) and 0.65535(65.535%%).
         ...
       ],
     }

Result:
{                      (json object)
  "txid" : "hex",      (string) The transaction id
  "asset_guid" : n     (numeric) The unique identifier of the new asset
}

Examples:
> syscoin-cli assetnew 1 "CAT" "publicvalue" "contractaddr" 8 1000 127 "notary_address" {} {}
> curl --user myusername --data-binary '{"jsonrpc": "1.0", "id": "curltest", "method": "assetnew", "params": [1, "CAT", "publicvalue", "contractaddr", 8, 1000, 127, "notary_address", {}, {}]}' -H 'content-type: text/plain;' http://127.0.0.1:8370/
The primary attributes related to Syscoin Bridge functionality are [contract], [precision], and [max_supply].
[contract] should be set to the ERC-20 token contract address, omitting the leading '0x' (e.g. '0xb060ddb93707d2bc2f8bcc39451a5a28852f8d1d' should be set as 'b060ddb93707d2bc2f8bcc39451a5a28852f8d1d').
[precision] should be set identical to that of the ERC-20, or as close as possible. If >8 then simply specify it as 8.
[max_supply] should be set identical to or less than the max supply of the ERC-20.
aux_fees
You can define a custom fee structure for your token. Learn about aux_fees and how to implement them.
In our assetnew example below we are making an SPT for the FunFair ERC-20 token.
- The supply and precision attributes are set as close as possible to the ERC-20.
- For now we are setting [update_flags] to 127 (fully update-able token spec). This can be changed later to "lock-down" or trust-minimize the token spec prior to public use. This will be covered later in this guide. Setting any other flags at this point could prevent minting.
- [auxfee_details], [notary_address] and [notary_details] are left blank in this example. These are optional.
syscoin-cli assetnew 1 "FUNx" "FunFair Interchain Token" 419D0d8BdD9aF5e606Ae2232ed285Aff190E711b 8 9999999999 127 "" {} {}
Once you have defined your assetnew command and checked it thoroughly, you may execute the command. The command will sign and broadcast the transaction, and return your transaction ID. Note this transaction ID for later use.
After this transaction has at least one confirmation you can execute the following command to review your SPT spec as it is present on the Syscoin blockchain.
assetinfo [asset_guid]
It should look similar to this and reflect the attributes you set in assetnew:
syscoin-cli assetinfo 490411102
{
  "asset_guid": 490411102,
  "symbol": "FUNx",
  "txid": "341af480b61361386a8b63edabc5cecbbc16799c043ca15058eb654bb07dcf74",
  "public_value": "{\"description\":\"FunFair Interchain Token\"}",
  "address": "sys1qn5ls49y3lsglzzu2m4dmdprny0zx4s228ewq4n",
  "contract": "0x419d0d8bdd9af5e606ae2232ed285aff190e711b",
  "balance": 0.00000000,
  "total_supply": 9999999999.00000000,
  "max_supply": 9999999999.00000000,
  "update_flags": 127,
  "precision": 8
}
4. Mint and burn the entire SPT supply
The entire SPT supply needs to be minted and burned by you, the owner, as part of securing the supply characteristics of this SPT that will be used with Syscoin Bridge. After this, only the bridge process will handle minting the SPT (based on burn proofs), not the SPT spec owner, for trust-minimization.
4.a. First, we to get a new address, then mint the entire supply to that address using assetsend.
Specify your new [asset_guid] which you noted in Step 3. For [amount], enter the same value used for [max_supply].
$ syscoin-cli getnewaddress "FUNx mint address"
sys1qn5ls49y3lsglzzu2m4dmdprny0zx4s228ewq4n

$ syscoin-cli assetsend 490411102 sys1qn5ls49y3lsglzzu2m4dmdprny0zx4s228ewq4n 9999999999
assetsend will sign and broadcast the transaction, and return your transaction ID. Wait for this transaction to have at least one confirmation, then proceed.
4.b. Second, we need to burn the entire minted supply using assetallocationburn
Specify the [asset_guid], followed by the [amount] specified in Step 4.a, next for the NEVM [address], specify your own NEVM address or the address of the ERC-20 contract you are bridging with (in the context of provisioning, the NEVM address used here is arbitrary but must be populated to execute the command), but omit the leading '0x'.
syscoin-cli assetallocationburn 490411102 sys1qn5ls49y3lsglzzu2m4dmdprny0zx4s228ewq4n 9999999999 0763e1D872f2D72dD75F1ea1630DDa726aCa3FAB
assetallocationburn will sign and broadcast the transaction, and return your transaction ID. Wait for this transaction to have at least one confirmation, then proceed to Step 5.
5. Add your SPT to the Syscoin Bridge Asset Registry
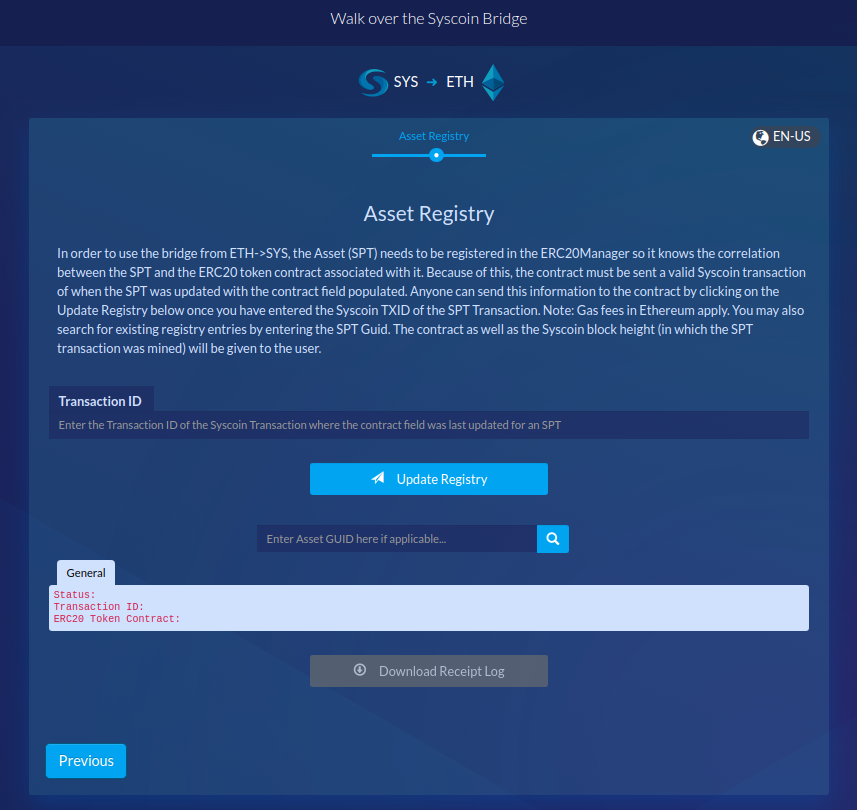
In order to use the bridge from NEVM->UTXO, the SPT needs to be registered in the ERC20Manager contract so it knows the relationship between the SPT and the ERC-20 token contract. Using Asset Registry accomplishes this. This process requires an NEVM web wallet such as Metamask. We recommend Metamask.
Head to the Bridge Dapp and click the 'Asset Registry' button.
Mainnet: https://bridgev1.syscoin.org
Testnet: https://bridge-testnet.syscoin.org

The contract must receive a valid Syscoin transaction Id representing when the SPT was created or when the [contract] field was last changed - whichever is most recent.
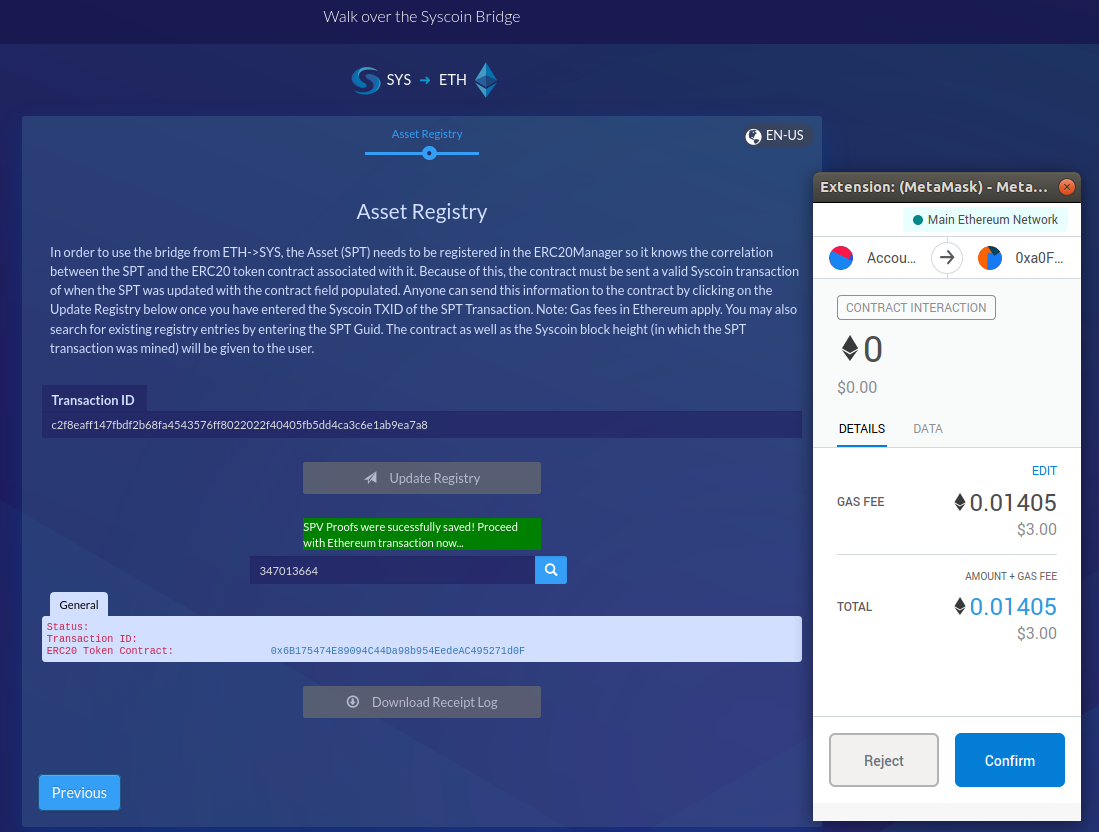
In our case this is the transaction id of our assetnew transaction sent in Step 3. Paste it into the Transaction Id field, then click 'Update Registry'.
"Superblock has not been stored in local database yet" or "Superblock has not been approved yet"
Please wait a little longer.
Once your superblock is available and you submit the transaction Id, your Ethereum web wallet will present you with transaction authorization requests. Review and confirm/authorize these requests.

Wait for these contract transactions to confirm on the NEVM network. Then you should be able to perform a look-up of your SPT's registry entry by entering the Asset GUID in the search box. Verify the correct ERC-20 Token Contract address is shown. In which case, congratulations! Your SPT is registered for use with Syscoin Bridge!
You may now proceed to https://bridgev1.syscoin.org and click the 'NEVM -> SYSX' button to send your ERC-20 across Syscoin Bridge for the first time!
What if I update my SPT with a different ERC-20 contract address?
In this case you should re-register the asset using the transaction Id of your
assetupdate, following the same process above.
6. Trust-minimize the SPT
Exercise diligence before locking-down any attribute(s) of your SPT spec
Changing [updatecapability_flags] can be irreversible depending on the value set. Prior to doing this, make sure your SPT is fully configured as it should be, including [auxfee_details], notary fields and other attributes. Make sure you understand the implications for your SPT, the bitmask values, what they represent, and how to use them before doing this. Refer to
help assetupdatein the console for further information. You can also reach out to the Syscoin Community at the Syscoin Community Wiki for information and/or assistance.
Technically this step is optional. However, you should consider making your SPT trust-reduced before you make your bridge available to others as a service. Trust reduction can be done by issuing an assetupdate transaction to change the [updatecapability_flags] attribute of your SPT. At your discretion you might choose to lock-down [contract], [max_supply}, [notary_details} and/or other fields.
Bitmask Values
1 represents the ability to update public data field
2 for updating the smart contract field
4 for updating supply
8 for updating notary address
16 for updating notary details
32 for updating auxfee details
64 for ability to update the capability flags (this field)
127 for all
0 for none (no fields update-able)
e.g. A bitmask value of 50 means the following fields are update-able: auxfee, notary, smart contract.
50 = (32 + 16 + 2)
Refer to help assetupdate for further information.
Updated about 3 years ago
